|
MAY / JUNE 2007
Well... it's begun. After letting this stew for a few months I've finally started to actively look for information and photos of Vera. There ain't much info out there. Common knowledge is that she was made for the movie Showtime and later modified for Firefly, as many other props were. She was based on a Russian Saiga shotgun, which is sort of derivative of the AK47. But really, there isn't much left of the original rifle. She has many (many) specially machined aluminum parts that were anodyzed in several different colors. There are a few good photos out there, the best of which can be found in the Firefly Companion Vol 2, which is a great read (as is Vol 1 by the way).
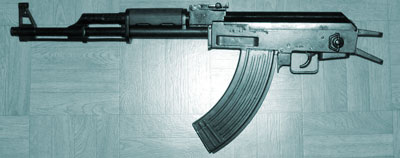
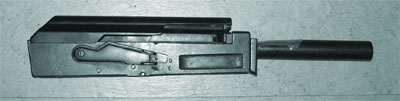
Hmm... there are no Saiga airsofts out there and I can't own a real one, even if it is deactivated so I went and got the next best thing- a Denix AK47 replica. After a couple days in the garage with a saw and angle grinder, this is all that is left of it:
Stock and grip removed, still intact
After some sawin' an' grindin'

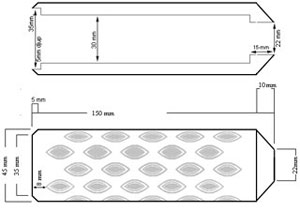
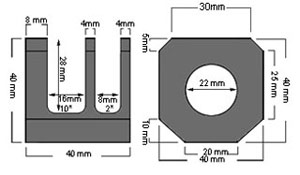
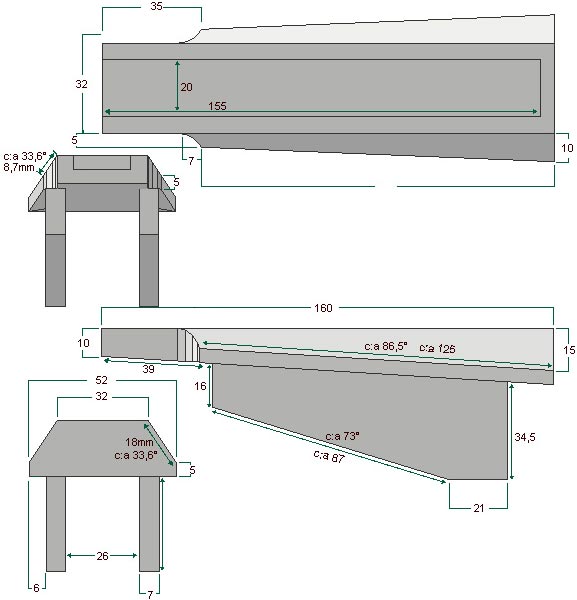
I know from the Companion vol.2 that the real prop is about 90cm long. I took a side photo of her and blew it up to the correct size. I was then able to start measuring the different parts and details. There are a lot of measurements to keep track of and enlarging a small photo several hunder percent leaves it rather blurry. I believe my measurements are pretty close to accurate, but obviously there will be a few millimeters here and there that will be a bit off. The receiver of a Saiga isn't identical to the AK, but pretty close. I've been looking at photos of Saigas a lot and by measuring the receiver of Vera in my blown-up photo an comparing it to the AK replica I've concluded that they aren't wildly different. The Saiga seems a bit "meatier" and has more surface detail as well as what appears to be a larger ejection port. I'm pretty sure I can manufacture some details to attach to the AK to accurize it a bit. I'll be starting on the 3D files soon as well. Here are the first batch of blueprints.
JULY 2007
All the blueprints / plans are now nearling completion and I'm working on the 3D models which should be done soon. Since I'm using the BPs to do them, it gives me a chance to double check my measurements. I've spotted a few things here and there that weren't consistent.
CNCs and Rapid prototyping machines usually need things modeled in geometry called "Nurbs", which are basically curves. Since my modeling knowledge comes from the video game industry, I am doing them as "meshes" (quads and triangles) with the aim to convert them into a better format later. If some of the parts end up being done manually, the 3d files will not be essential, but they will still be very useful as reference. If my 2D drawings are unclear, the machinist can double-check my 3d models to make sure things come out right.
Also, I finally found a machinist willing to make the parts at a very good price.
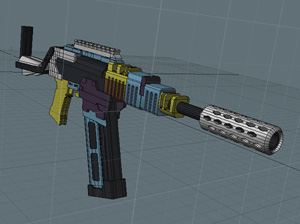
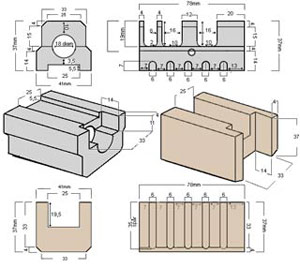
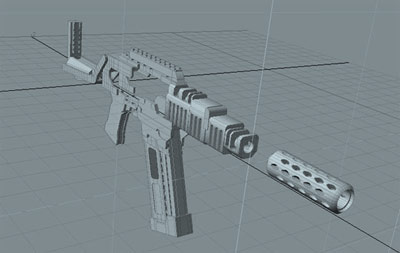
Here are some screengrabs of the first WIP 3d parts:
 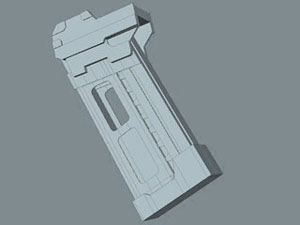
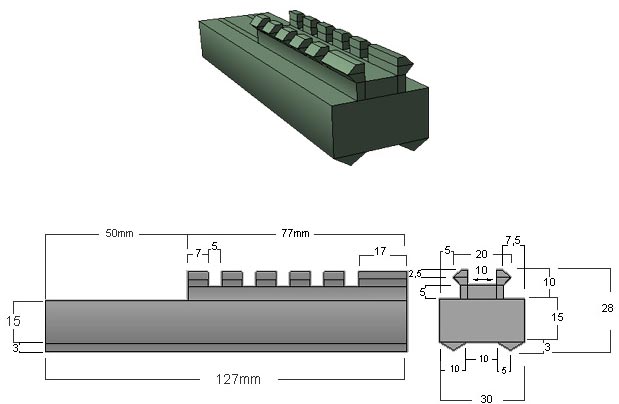
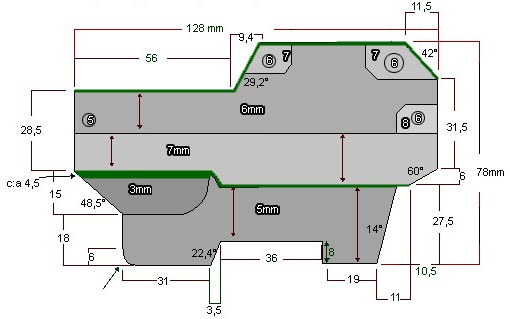
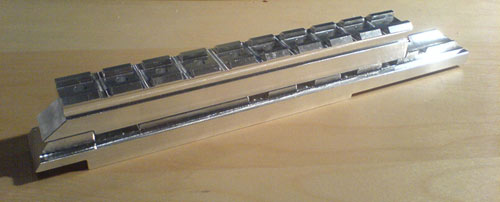
More stuff done. Here are some full-size blueprints. For the top scope rail and buttplate I've tried to follow the "piccatinny" standard for rail sizes. It's not 100% exact, but I should be able to attach a scope to it with a little fiddling. Since the top rail will be permanently bolted onto the bottom rail, I decided to simplify it and not include any scope grooves at all to make it easier for the machinist. (I figure there's no need to put effort into something that will not be seen.)
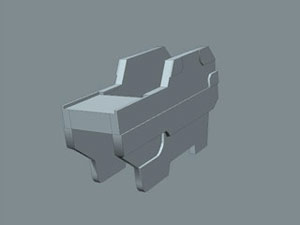
Here's the extra shell rack that goes into the stock. It looks simple, but this was actually one of the hardest parts to draw. Even with the latest detail reference shots, this piece is hard to gauge. It's got all these subtle angles and curves.
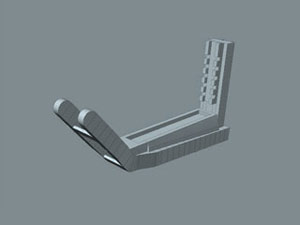
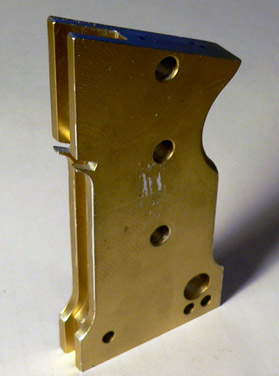
Another hard-to-do piece that I've reworked a couple times. The "maglock" as I like to call it. It sort of holds the whole rifle together since it connects to so many key parts. Even with careful planning, I might have to do a little tweaking so that it fits seamlessly to the replica AK receiver, but I'll tackle that when I get the parts and it shouldn't be too difficult.
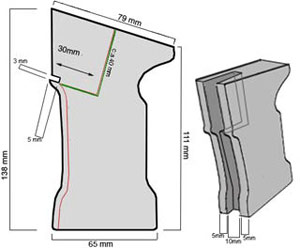
Doing final revisions on the 3D parts. While going over the plans, I got kinda concerned about certain parts, like the grip. I was afraid that I had made it too large. As an experiment, I made a foam prototype of the grip:
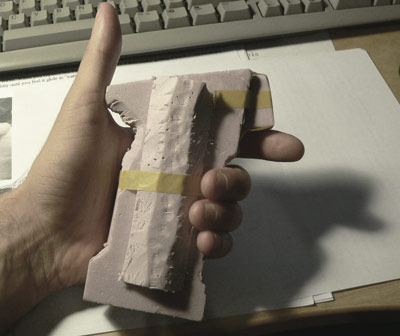
Much as I expected- it's HUGE! My trigger finger can barely reach all the way to the trigger. Before doing any major changes, I decided to consult the owner of the real Vera, who kindly confirmed that the real grip is very large and uncomfortable.
Blueprints and 3d models are now complete. I'm stoked. It's been many a long night, but when I finally have the parts in hand it'll be like Christmas! Now all I gotta do is keep busy and try not to think too much about the project until I have the parts.
An overview chart showing all the parts that will be machined.
AUGUST 15th
Sung to the theme from Rawhide:
Waiting, waiting, waiting
Oh, this endless waiting
Keep the prop guy waiting, all night
Rain and wind and weather
Hell bent, for metal
Wishing, my Alice by my side...
It's summertime here and that means most machine shops are closed. I've got to wait till late august until this gets rolling again.
AUGUST 25
Having some troubles with the machinist... the initial cost quote has now almost tripled and is so high that there is no way I can cover it. Looks like I'll have to start looking again. It's getting exhausting, but this project will get done somehow. I'm wracking my brain to find a solution.
Still, even when I finally have the parts, I will be putting some work into them. To make it easier on the machinist, I left out things that I can do myself, such as drilling holes. Still don't know if I'll have them anodized or not. Second best method is doing tinted "candy" clear coats of the colored pieces.
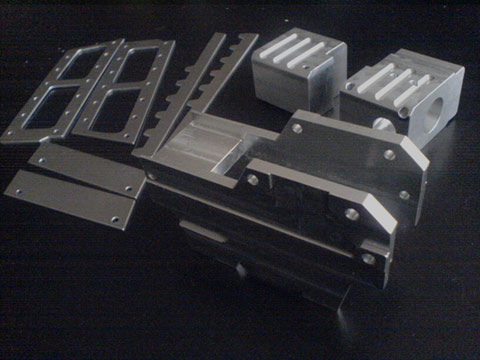
This is a breakdown of all the parts that are being machined.
SEPTEMBER 25
Wow... a whole month without an
update. Sorry for that folks, but here is some rather spectacular
news. To some of you, this is old news already, but I've
managed to find a new machinist- one that is knowledgeable
about firearms and is showing genuine enthusiasm for the project!
After speaking on the phone and meeting with him it all feels pretty
definite. I've even handed over my AK receiver so he can have it
handy while machining the parts in case he needs to double-check the
fit.
He also suggested that I in fact add a few details to
the blueprints, such as all the drill holes (I was planning on doing
them later), the idea being that they'e a lot easier to do perfectly
in a CNC. The shell rack in the stock will also be upgraded so that
real 12-gauge shells will be removable (as opposed to being glued,
which was my initial plan).
I just checked in today to
make certain everything was still on track. The current estimate is
that machining will begin as soon as October rolls in and I'll have
the parts up to a month or so later depending on when certain
machines are available.
I'll be trying to snap a couple of photos as
soon as it all gets rolling, so stay tuned. In the meantime, I'll be
keeping busy by finishing up some Jubal Early pistols.
DECEMBER 11
First off, apologies for not
updating more regularly. It's been a long couple of months. For
various reasons, my machinist didn't have time to do the parts in
October, but I have been in continual contact with him and he has
promised me a set of parts before Christmas, which is now less
than two weeks away. The wait has been excruciating
and I really hope all goes well ,'cause I
can't stand to wait any longer.
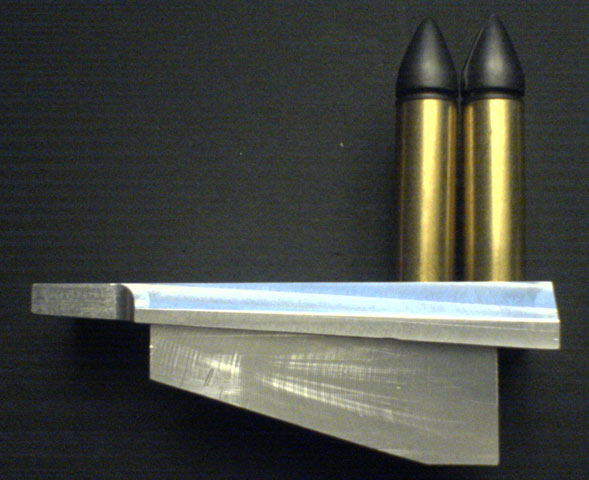
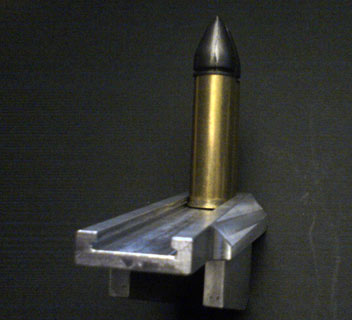
While waiting, I have made some progress on
other projects as well as creating a few details for Alice. Most
notably, I've gone and made a big pile of BULLETS for the ol'
gal! First, a pack of 12-gage, full brass Magtech shotgun
shells was ordered. While waiting for them to arrive, a master slug
was created by balling a blob of epoxy resin around a screw. Once
the epoxy had
set, it was fastened
in a drill. The drill was run at high speed and the spinning
blob of epoxy was ground and filed into the proper shape. Think
of the whole thing as a primitive makeshift lathe. (It would of
course have been easier to do it on a real lathe, but I was in a
rush and didn't want to wait until I had access to one.) Also,
please note... using a drill like this is potentially dangerous
if you don't know what you're doing and I can't take any
responsibility if someone out there gives it a try- you have been
warned!
Here are a couple of pics of the finished
bullets:
DECEMBER 17
THERE BE
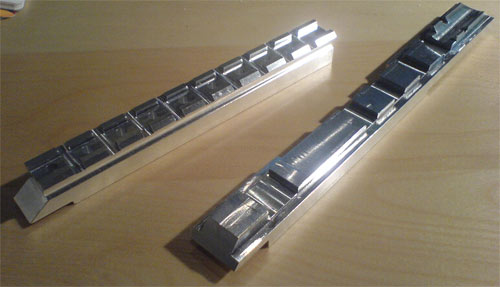
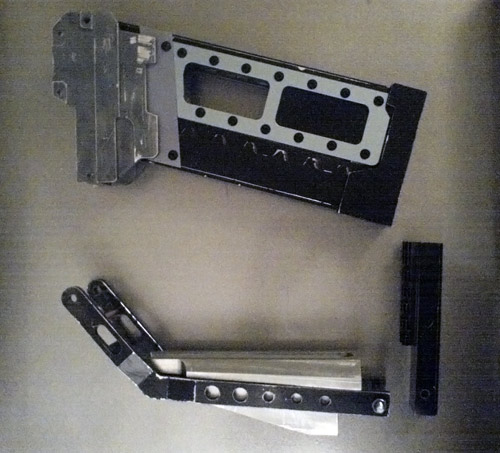
RAILS HERE! The first machined parts have arrived!
Let there be much rejoicing!
Last night I got an e-mail
saying that the first couple of parts were done. On the way to work
today I went to pick them up. It's a really real project now.
FINALLY! Hopefully this means more regular updates... too early to
hope for a full set of parts before the Red-Suited Fat Guy comes but
at least the ball is in motion.
Here are pics (sorry for the
crap quality... snapped 'em with my cell phone):
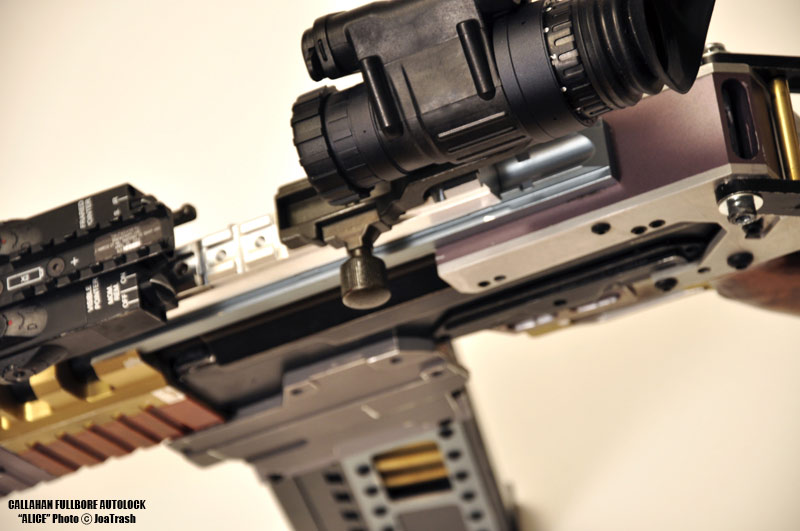
DECEMBER 18
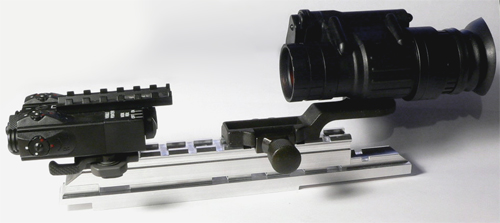
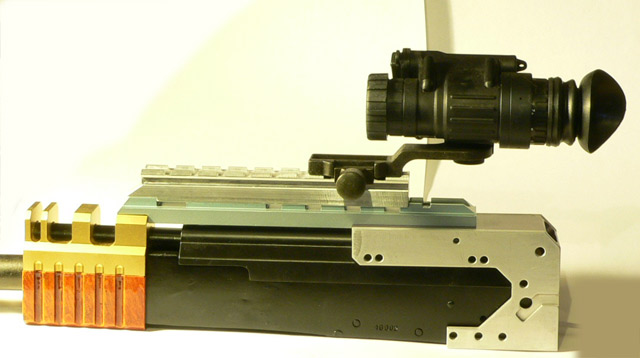
Nothing new to report but I thought y'all might like to see a snapshot of the rails with the D-LAP and scope.
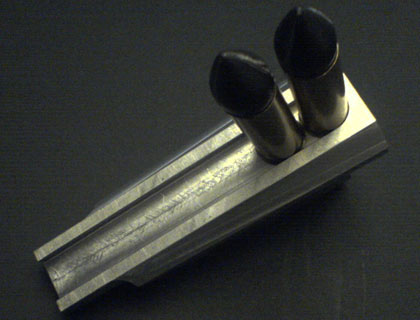
DECEMBER 27
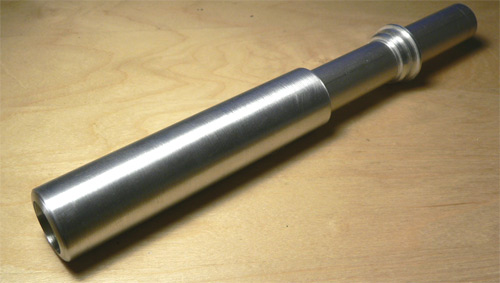
While you all were finishing up the eggnog, I my own self was busy machining a couple of parts for Alice, since I had access to a lathe over the Christmas hoidays. The parts you see below are not part of the blueprints. These are parts I always planned on machining myself since they're simple enough to only need a lathe (and not a mill). The parts are: the "inner" silencer that goes insude the flash hider (part#1), the actual forward barrel and the barrel "locking ring" (goes right behind part#2) . The silencer isn't really visible on Vera unless you're staring down her barrel, but you can see it in the early version of the rifle as it appears in "Showtime". No more news on the other parts yet, but I'll try to get an update before New Year.
JANUARY 7
Happy 2008 to y'all! Nothing new to report except that the parts are being worked on. The current plan is that the barrel assembly will be completed first, then the rear (stock, shell rack, grip) and finally the magazine (which is the most time consuming group of parts according to my machinist). I wish I had more news, but I'm starting to realize that a project like this can't be rushed, so I'll just have to do the Monty Burns thing and bide my time. Stay tuned folks and thanks for the support!
JANUARY 9
Ha! No sooner do I write a
message about "nothing new" than I get a nice little surprise. I
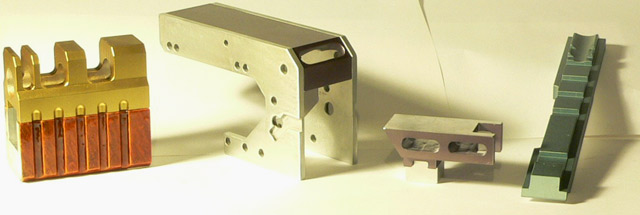
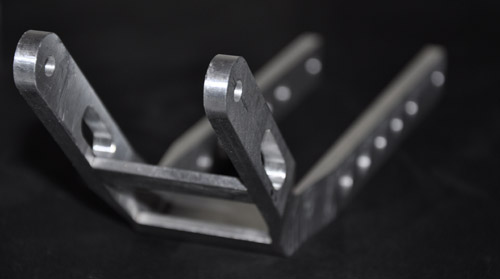
visited the machinist today and he had a few things for me. Three
more parts! Below you can see three of the barrel assembly pieces.
One of them was supposed to be done in wood, but when the machinist
tried it (I'm guessing with metal cutting tools) the wood just
shredded, so he did it in aluminum instead. Since I've become
somewhat adept at painting wood grain patterns this shouldn't be too
much of a problem and I can always go to a wood shop to get a
replacement done in the future if I really want it. Next up will be
the flash hider (which is a major piece and the one most people are
having a hard time trying to replicate) and the final handguard
component, which will allow me to assemble the whole front
section.
JANUARY 29
Hey all. No new parts yet as the machinist has been busy with another project. However, I've done a little color testing on the few parts that I do have. I'm pretty happy with the painted wood grain pattern on the handguard, but the glue is much too dark and the gold is a little too green in tint. I'll be doing some more tests over the next week or two, but you can at least (finally) start to see the Callahan coming together.
FEBRUARY 22
Whoa. It's been almost a month since the last update. Sorry all... I just haven't had any news as my machinist was busy. Today though I got a couple new parts- the trigger guard seen below. I also got to see a few parts that were underway, but not yet complete, so they're coming along. Well... my b-day is in a little over a month... I hoping my machinist will make a final big push to finish up the rest of the parts... crossing my fingers that I'll be able to wrap this up by then.
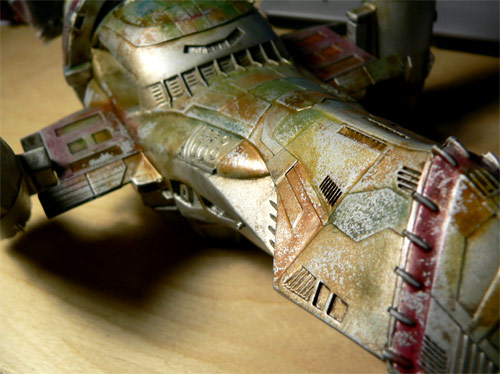
Since the above parts are just a small update I thought I'd share another Firefly-related project I've been fiddling with: A resin model kit/casting of Serenity herself! The kit was created by a very talented Browncoat. Below are some progress shots (please excuse the crappy photos... didn't have time for a proper photoshoot). Still very early days, but as you can see, I'm going for the "colored patchwork" look seen on the cover of the Official Companion Vol.2. This look wasn't commonly used on the show when Serenity appeared (the 3D models varied in appearance) but since most other models I've seen have gone for the more common silver-clean look I thought it'd be nice to do something a little off-beat. I also really like the way the patchy colors makes the ship look like she's been through a ton of refits, repairs and repaintings. Well, that's all for today... I'll try to make it less than a month to the next update. Till then... don't let the space bugs bite.
MARCH 25
Ok,
ok... I know I said I'd try to update sooner but there hasn't been
much to report. When last I spoke to the machinist there were
several pieces in different states of completion. We discussed some
options on how a couple of them should be tackled, like the magwell
and stock. Looks like both of them will be machined in several
pieces and then pinned and/or welded together. More news as and when
I get it. In the meantime, if y'all have any questions... go
ahead and ask. The e-mail address is at the bottom of the page.
APRIL
15
Stay tuned for a (sort of)
major update in the next few days. I got some new parts on sunday
(no pics yet though) and she's starting to come together. Very soon
I'll have all the parts I need to put together the whole trigger
assembly and Alice will go from being a pile of parts to something
actually resembling a rifle! The machinist had some bad luck
too... he had both the magwell and stock milled out of several
pieces to save machine time, with the intent of welding them
together. Unfortunately the parts were too small and thin to take
the heat and became grossy warped... so they're a total
redo.
APRIL
16
Here are some fresh pictures of her
current state of completion. She's now instantly recognisable as a
Callahan Fullbore. Still waiting for a lot of key parts. Next up is
probably (as I mentioned before) the grip and trigger
components.
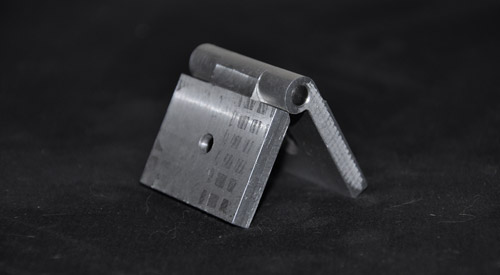
MAY 11
Things are coming along. Small change of plan (for the better). Looks like Alice will indeed have a folding barrel just like Vera! (was originally planning on leaving out that detail.) Also... here's the handle!
JULY 22
Hey all. Just wanted to let
y'all know that this project is NOT dead. I'm in the process of
moving and the machinist has been full up with other stuff. He did
say that he was going to work on the majority of the remaining parts
during july, so we'll see what happens. But Alice will definitely be
finished! Hope you all are having a great summer.
AUGUST
19
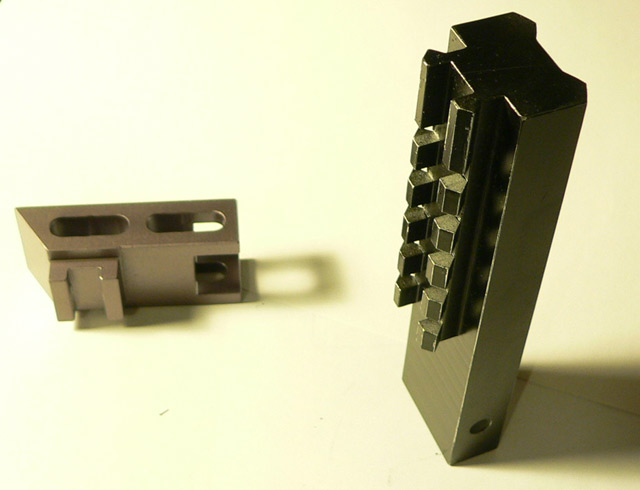
Time to get this wagon train
goin' again. Picked up the latest batch of parts the
other day. One of them is, in my opinion, on of the defining
parts of the Callahan- the magwell/maglock. It really ties the whole rifle together somehow.
It's gonna be a couple of weeks until I
can get the parts painted and bolted on, but I'll throw in a couple
of pics for y'all to drool at, haha. Folks, I think I can see
the finish line. There are only a few parts left: Muzzle, magazine (2 parts),
stock, barrel hinge (2 parts) and the shell rack. I can tell
you another thing too. This baby will be HEAVY. I did a dry
fitting with just some of the parts and was really surprised by the heft. Also
note that she now has a working trigger assembly! Well, that's all for
now.
NOVEMBER
19
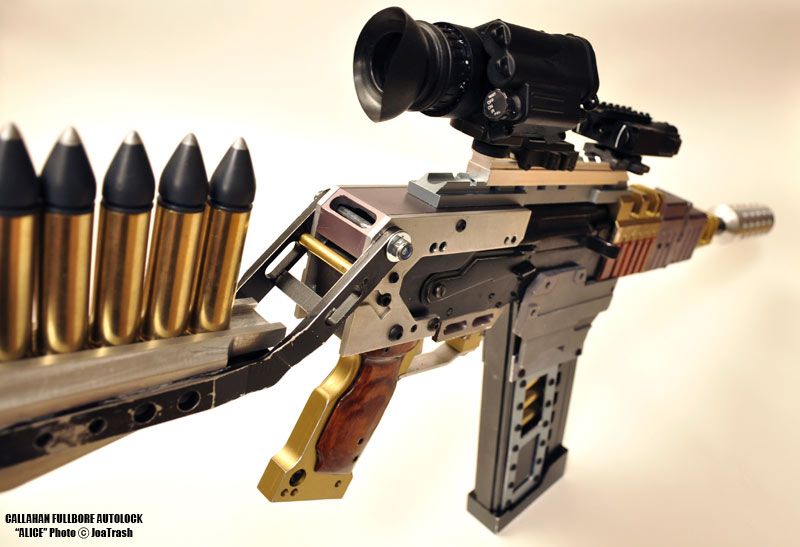
I've been getting a lot of mail about the lack of updates. I know it's been two whole months and I'm sorry about that, but there just hasn't been anything new to show and it was a mad rush up to Halloween. The machinist has been too busy with "real" work to do any parts but today I picked up another defining Vera piece- the ammunition shelf! It's another one of those parts that make Vera what she is, not just the gun from Showtime. Now, don't hold me to this, but the machinist said he wants to get the last few pieces done quickly, possibly even by next week, so we might be looking at a major update soon. But like I said... don't hold me to it 'cause anything can happen in the Verse!
NOVEMBER
24
No new parts today, but I have done some drilling of parts and I'll be doing some assembly soon. Also spoke to the machinist and he confirmed that he wants to finish off the last remaining pieces which are:
Magazine
Shoulder stock
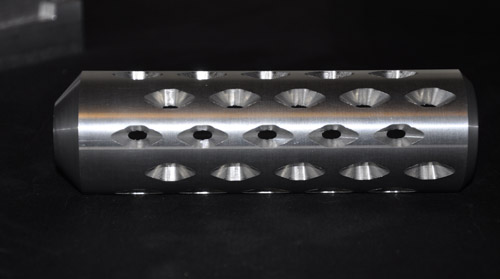
Flash hider
Folding barrel hinge
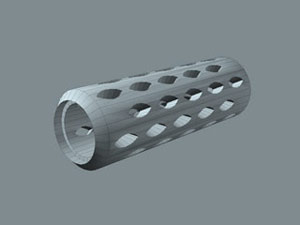
The flash hider is really the only potentially problematic part due to the pointed, tapered vent holes. Stay tuned, more updates soon (I hope).
DECEMBER
3
Ho ho ho! Err... ok... not yet. Well, the snow is falling outside and I'm waiting on the final pieces. Just got word that the magazine (2 pieces) is done and that the final parts (stock, hinge and flash hider) have been started. Like I've mentioned a few times already, the flash hider is the only remaining part that might be a bit of a challenge, which luckily, my machinist seems keen to tackle.
DECEMBER
10
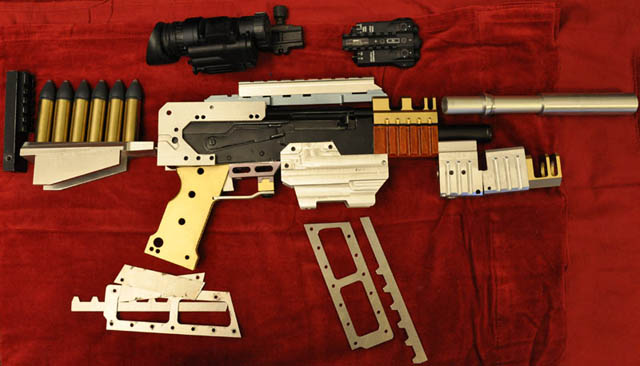
Almost there! Here's everything I currently have loosely assembled. Still need to get those last few parts.
JANUARY
2
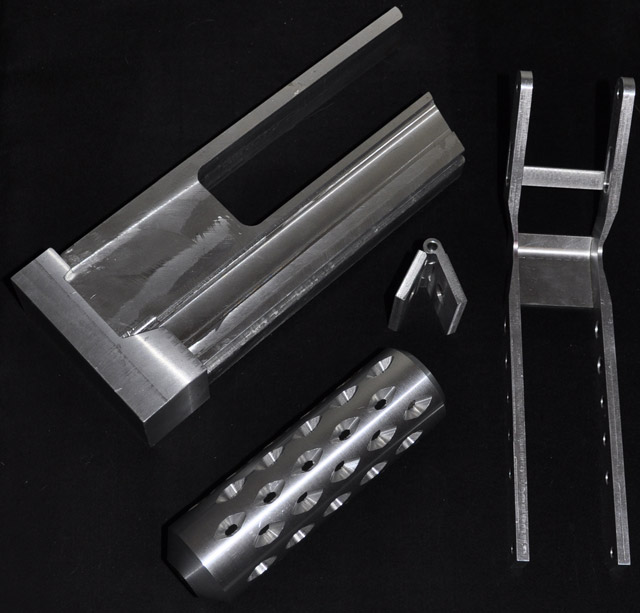
SHIIIIIIINEEEEEY! All machined parts for Alice are now in my possession! Picked them up earlier today and watched the flash hider being finished up. It's now over a year since I got the very first parts and the finish line is now in sight. I'll be starting the final buildup asap, so stay tuned. Until then, here are some pics of the final pieces. (They still need to be cleaned up and polished as they're basically fresh out of the mill.)
JANUARY
9
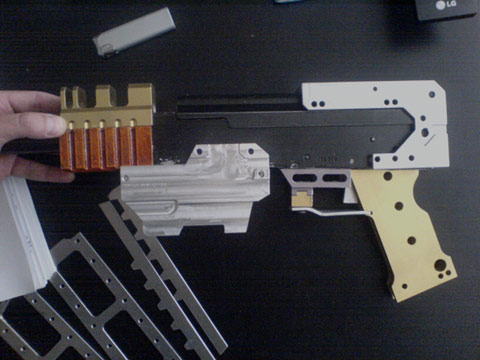
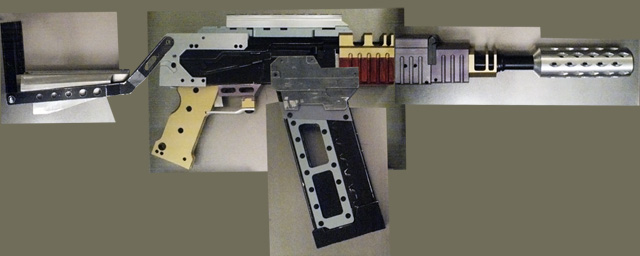
Almost there! Snapped a couple shots with my cell phone camera while doing final assembly. She's coming along nicely. Also did a quick mockup with all the parts together. The perspective is obviously off in places, but wow, everything is assemlbing without any major difficulties. The hardest part is making the whole thing stable. With no access to a proper workshop these days, I am mainly using a variety of glues and pins to put her together. I do however try to use screws where extra strength is really needed though, such as in the grip. In the end, she will disassemble into a few smaller pieces in case I need to take her someplace fun.
JANUARY
12
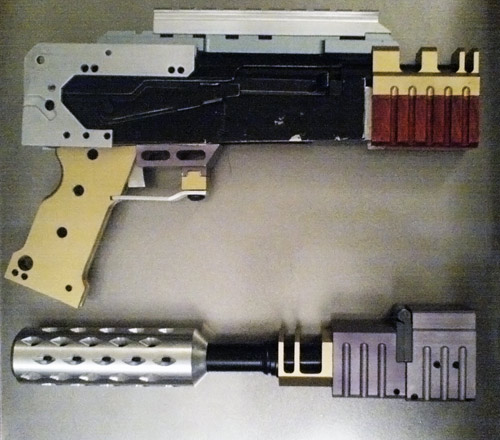
Update time again! The build is progressing. I was very close to having it completed a couple of days ago but I hit a little snag. I had her basically all put together, with just a few screws and small details to add. After waiting for the last of the epoxy gripping the magazine to cure for a couple hours I picked her up... and whoa was she HEAVY. Really heavy. Much too heavy in fact, to be handled with any sort of comfort.
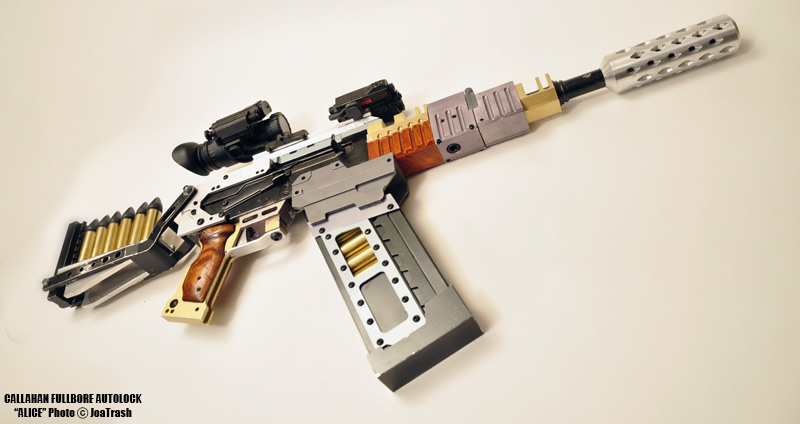
I concluded that one of the main culprits is the magazine frame, which is solid machined aluminum and weighs about 1.3 kilos. Its position on the rifle also throws off the balance quite a lot- it's not just the raw weight. One solution, which I am going to try, it to have the frame hollowed out by drilling. As a backup in case that isn't enough, I've build a replacement fram out of styrene that I will be mounting shortly.
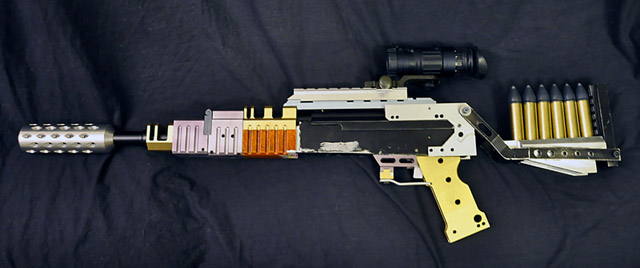
Here is a photo of her current state. What you see here weighs about 3.9 kilos- pretty close to the weight of an AK47 or M16. I expect another 500-1000 grams of weight when the D-LAP laser site and finished plastic/metal hybrid magazine are added.
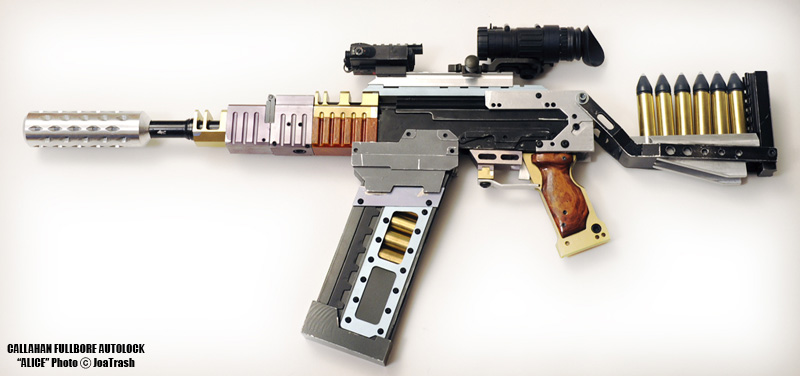
JANUARY
20
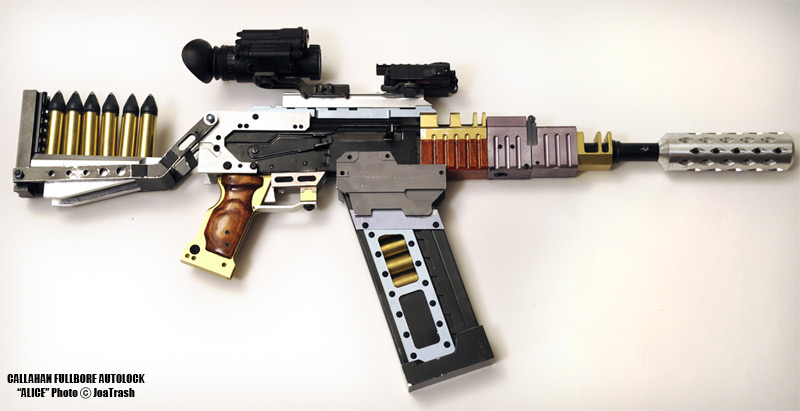
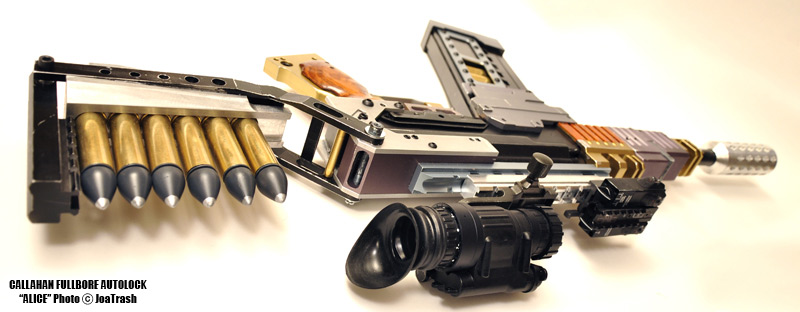
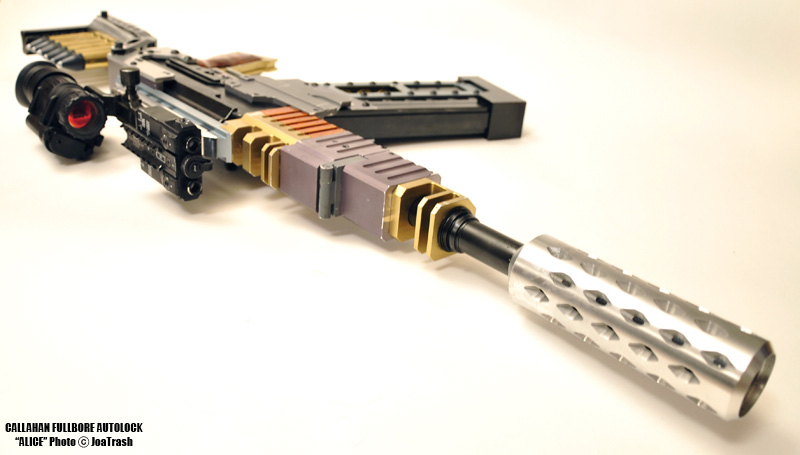
Well... she's done! The last few days I've been putting her together and carving out a set of wood grips. There were a few issues with getting the 2-part expoxy glues I was using to grip the parts strongly enough and I ended up using a combination of different brands. Wherever it was possible, pins and screws were used to strengthen the overall build. I don't have an exact final weight yet but it should be 4,5-5 kilos. Currently, Alice has a magazine frame made out of styrene but the original (now hollowed out) version will be added at some later date. One thing that did surprise me was how easy making the grips turned out to be. Initially, I was going to wait a couple months until tackling that part, but it just kept nagging at me, so last saturday I grabbed my Dremel tool and went at it. A couple hours later and they were done! Some thinned brown "citadel" ink and clear laquer completed the look. Not 100% accurate (almost impossible to do by hand) but I'm pretty happy with them and the feel of real wood as opposed to resin is so much nicer.
So that's it. After more than one-and-a-half years, spanning 2007-2009, I have finally completed the world's first (and currently only) Callahan Fullbore Autolock replica. It feels kinda surreal holding it. There were times when I thought it would never see completion. Despite a multitude of small inaccuracies to the real Vera, I think she turned out rather well- certainly the crowning piece in my collection of prop replicas. There are a couple things I want to add some time in the future, like the barrel folding lock and magazine release knobs but for now she is going up on my wall. A big THANK YOU to all who have followed this build. Keep asking questions if you like. There will not be a whole lot of updates for a while, but in the not-too-distant future I'll be starting a new Firefly-related build. Until then, keep flying... and enjoy these photos!
|
|